Thursday, November 8, 2012

Joe's Special


Trying to maintain a semi-low carb diet while trying to make as many of the 101 Classic Recipes as possible has proven to be a challenge.  Any other time I would whole-heartedly embrace all of these recipes, so full of potatoes, hominy, flour, and pasta, but for the next few weeks I am trying to be good to make up for what I'm sure will be a calorie filled set of holidays.  That being said, one of the low carb recipes that can be found in the set of recipes is Joe's Special, listed in James Oseland's description as "one of the most odd and divine scrambles known to man".  According the the article, the dish originated in San Francisco Italian-American restaurant and has since moved into the dinner menu of a generation of home cooks in Northern California.  I decided to make it for the family as a quick Sunday dinner.

The ingredients for Joe's Special are:

2 tbsp. olive oil
5 cloves garlic, minced
1 medium yellow onion, finely chopped
8 oz. ground chuck
1 10-oz package frozen, chopped spinach, thawed and squeezed dry in paper towels
8 eggs, lightly beaten
Kosher salt and freshly ground pepper, to taste
1/4 cup finely grated Parmesan cheese
Crusty Italian bread, for serving

The recipe itself is pretty straightforward and if you can make scrambled eggs - you can make Joe's Special easily.


The first step is to Heat the oil in a skillet over medium-high heat and add the garlic and onion until soft,  between 5 and 7 minutes.  Add the chuck and stir until completely cooked through and all the moisture has evaporated, about 10 minutes.   


Stir in spinach and cook until heated through, 2 minutes.  Add eggs and cook until eggs are firm and mixture is slightly dry, between 4 and 5 minutes.


Season with salt and pepper, sprinkle with Parmesan cheese and serve with bread.

Credit: Todd Coleman
I must say that while the spinach in the previous recipe (Saag Paneer) existed in harmony with the other ingredients in making a terrific taste profile, the spinach in Joe's Special seemed to overpower the other ingredients.  I supposed if I had used baby spinach rather than the frozen/thawed spinach, the flavor would probably have been less intense.  With that said though, eating the egg mixture with bread actually made a big difference.  It seemed to temper the spinach flavor and bring out the natural creaminess of the eggs and cheese.

I'm sorry to say that this is a recipe that I probably will not make again - unless I find myself with a handful of ground beef, spinach and a few eggs lying around.

10 recipes down, 91 to go.

Sunday, November 4, 2012

Saag Paneer

Ingredients for Saag Paneer

One of the reasons that I wanted to start this blog/challenge was to break myself out of the culinary rut that I have been in for the past few months and as well, expand the palate of both myself and my wife.  We don't tend to be as adventurous as I'd like to be and I felt that the set of 101 Classic Recipes listed in the 150th issue of Saveur Magazine might just be the ticket. With that, I knew that there were would be many ingredients, a few techniques and a few styles of cuisine that I had never used, attempted or tried.

My next dish, Saag Paneer (Spinach with Fresh Indian Cheese) would take care of two of those at one time.  While I have made many things in my life, but cheese is not one of them.  I have also never tried Indian food - neither cooking it nor eating it.  I was very eager to take a crack at it.

Ingredients for Saag Paneer:

For the cheese:
8 cups milk
1/4 cup fresh lemon juice
6 tbsp. ghee or canola oil

For the spinach:
4 cloves of garlic, chopped
1 1" piece ginger, peeled and chopped
1 serrano chili, stemmed and chopped
6 cups finely chopped spinach
Kosher salt, to taste
6 tbsp. heavy cream
1/2 tsp garam masala
1/2 tsp cayenne
Indian flatbread or rice, for serving

A quick apology, when I made this dish I had a guest in the kitchen and found myself chatting as much as cooking (which usually is my favorite way to cook :-)) and I completely forgot to take pictures at steps I normally would have.

First I set the milk in a large sauce pot on medium high heat until just under a boil, keeping in mind to stir often with a wooden spoon so that it didn't scorch.  While a good burnt flavor is desirable in some things (hamburger, steak, creme brulee), it renders other things like popcorn, garlic and in this case, milk, completely inedible in my opinion.  While the milk was heating (and in between stirs) I set up a colander in the sink with four layers of cheesecloth on it, edges hanging over the sides.

Once the milk started its lovely pre-boil undulations, I lowered the heat and added the lemon juice to the pot and stirred slowly for thirty seconds while the milk curdled.  Once the curds and whey had separated, I poured them into the colander, catching the curd in the cheese cloth.  I rinsed the curd in order to remove any lingering lemon juice and tied the corners of the cheesecloth together, gently squeezing out the liquid.  I then inserted a wooden spoon and let the cheese drain over the large pot for an hour and a half.

Leaving my cheese hanging.

After the hang time, I untied the cheesecloth and overlapped the edges and set it on a plate and set a heavy weight (see cast iron skillet) on it for another 45 minutes. 


Cast Iron Skillet - Kitchen Mulit-tasker.

Below is the cheese that was produced from the squeezing and pressing.  In retrospect, while the texture of the fresh cheese is rather addicting, the flavor left a whole lot to be desired.  When I try my hand at this again I will better squeeze the curd when in the initial compression stage (mine ended up a bit loose as you can see in the photo) and I will salt liberally with sea salt.

Post Press Cheese

The cheese was then cut into 1/2" x 1" cubes which, as previously mentioned, were a bit loose and fell apart easily.

Cheese ready for the pan.

I poured the canola oil into a non-stick pan over medium heat and fried the cheese in batches.

In over 33 years of cooking experience, I have tried cooking many things, many ways, but I have always had an issue with pan frying.  I know that the issue in all likelihood is me, however I like to blame things like the pans I have used, the cook tops, even the spatulas.  The issue isn't that I routinely create a fiery train wreck of a meal every time I wield a pan.  Instead, I am cursed by the mediocre results. Oh, I can saute a mean onion or mushroom, but when it comes to getting that perfect, crusty, crunchy caramelization on food, I end up pulling up short or going to far and ending up with burnt bits.  The browning of the chicken for another of the recipes included in this blog, Chicken with Forty Cloves of Garlic, is a perfect example.

The paneer was no exception.  While I tried to let the cheese cubes sit long enough to caramelize and release from the pan, they still ended up sticking and making little bits of burnt cheese.  By making the cheese a bit firmer the next time round, I hope to rectify that problem.

Paneer getting its brown on.

As I said though, not a fiery train wreck, just less than optimal (still yummy).  Once the cheese had been browned all over, I transferred it to a plate for use later.

Garlic, Serrano Pepper and Ginger pre-blend and Fried Paneer

While the the cheese sizzled away, I placed the garlic, ginger, chili and 1/2 cup water and pureed.  The original recipe states that it should be pureed into a paste, but with that much water, it was not paste like at all.  Note to self, next time cut the water in 1/2.


Garlic, Serrano Pepper and Ginger - post blend.

  Once the cheese had finished, I returned the pan to medium heat, added the garlic concoction and cooked until "fragrant", about 30 seconds. 


I tossed the spinach into the pan, coating with the bubbling liquid and stirred the chopped leaves until they had wilted, then covered the pan and cooked, stirring often, until the spinach was soft about 15 minutes.  Though the original recipe does not instruct you to add water while the spinach cooks, I found that over the course of 15 minutes I added approximately a 1/3 cup of water to make sure the spinach 
didn't completely dry out and burn.

Chopped Spinach

After the spinach had softened, I stirred in the cream, garam masala, and cayenne, stirring to incorporate fully.  I added the previously cooked cheese to the skillet, covered and cooked until the liquid had thickened and the cheese had warmed through, about 15 minutes.  I was a bit afraid that the cheese might dissolve or at least begin to break apart, but it seemed to hold together well.  I also stirred gently while cooking in order to make sure I did not expedite the process prematurely.

I served the Saag Paneer with brown rice rather than traditional Indian flatbread, but I must say I was pleasantly surprised.  While the spinach flavor was evident, it was not overpowering. The garam masala (a combination of spices including cumin, coriander, cardmom, pepper, cinnamon, cloves and nutmeg) presented a spicy match to the earthy spinach and the cayenne delivered a heat that was a slow burn.  You didn't really get it on the first bite, but it built from the second, to the third and by the fourth or fifth, you were breaking a sweat.  The texture was creamy and smooth, with the slightly crunchy paneer providing a slight change in pace in each bite.  My constant companion and trusty taste tester,  Kim, was quite surprised with how much she enjoyed it.  She noted that while she wasn't a huge fan of spinach, the flavor was good and the heat gave it a nice kick and that she would be in favor of having it again. 
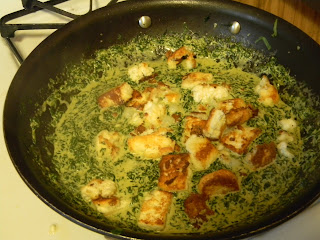
Saag Paneer - Schuler Version
Saag Paneer - Saveur Version
Credit: Todd Coleman
Another recipe down, not a full on success, but a great learning experience.  Once I have finished the 101 recipe challenge, I am certainly going to try my hand at cheese making, at least in some form (cheddar anyone...maybe I could change my basement into a cheese cellar?) and I am definitely interested in trying more Indian cuisine.

9 down, 92 to go.

Tasty Bits 1

In addition to the posts describing the prep of the recipes in the 101 Recipe Challenge - I'm going to be writing additional posts with random thoughts, additional information and other fun "tasty bits".  That is the one of the best parts of cooking isn't it?  Grabbing those little "too cooked" or "over crunchy" bits from the bottom of the pan after the meal has been cooked.  The tastiest french fry to me has always been the little, itty bitty runt fry that is crunchy all the way through.  When making oven fried chicken, I often crave the crunchies left in the bottom of the pan after the chicken has been cooked.

I won't be pushing links to these tasty bits out via Twitter, Facebook or Pinterest, at least at first.  I'd like to see how the views accumulate, or don't.  Part of the ever evolving experiment of this blog.

This evening I made one of the 101 recipes for a second time, this time in a normal, everyday situation, but with a few changes.  Instead of using ground beef or chopped steak, I used chopped chicken breast.  I also switched out the matchstick potatoes for noodles and changed the beef stock for chicken stock and doubled the sauce.  The meal turned out fantastic, thought as with many times, chicken that is pan fried turns out to be a bit tough. 

Another little bit - while I'm thinking about it.  I need to start looking up ways to encourage comments on my posts.  The traffic is interesting, but I think that I would really enjoy conversations that may be initiated by comments.  When I post links on the FB page, people comment on the links, but not on the posts.  Frustrating, but I'll get there.


Tuesday, October 30, 2012

Beef Stroganoff

Beef Stroganoff Ingredients

Growing up, everyone has certain food or dishes that become staples in the family menu and get passed on from generation to generation.  In the Schuler household we had several. Rice Ole, Creamed Chipped Beef on Toast, Turkey Casserole with Cranberry Pinwheels and of course, the creamy, beefy, noodle-y masterpiece, Beef Stroganoff.  The version that we enjoyed in our family consisted of hamburger, onion, mushrooms and sour cream cooked up and served over buttered noodles.  When I first saw "Stroganoff" on the list, I was excited, but this version is bit different than the one I grew up on, substituting matchstick potatoes for noodles, beef tenderloin for hamburger and without mushrooms.

The ingredients for this version of the recipe are:

4 tbsp. unsalted butter
2 tbsp. flour
1 tsp. dry mustard
1 cup beef stock
1/4 cup sour cream
1 small yellow onion, thinly sliced
11/2 lb beef tenderloin, cut into 3" x 1" x 1/2" slices
Kosher Salt and fresh ground pepper to taste
Canola oil, for frying
4 russet potatoes, peeled and sliced into 1/8" matchsticks
2 tbsp. finely chopped parsley.

As with many recipes, in order to get the dish done properly, you have to be able to multitask efficiently.  You must create a roux and the sauce; peel, slice and fry the potatoes, cook the beef and onions and then bring everything together.  Usually not a big issue for me, but through in taking notes and pictures...and we have a party! 

Matchstick Potatoes In Progress

First on the agenda was to peel, slice chop the potatoes into matchstick potatoes.  After chopping them, I put them between paper towels to draw out a bit of the excess moisture.  A trick to crispy matchstick fries is to make sure they are as dry as possible, and placing them into oil that is properly heated.  I poured the oil to a depth of about 1 1/2" in a dutch over and heated to 375 degrees.  Working in batches I fried the potatoes up until they were golden and crisp (about 5 minutes).  It took me a batch or two to figure the right amount of potatoes to put in at once (about a cup and a half) as when you put too many into the oil at once, they drop the temperature of the oil down faster than the burner can heat it, not only slowing down cooking, but slowing the frying process, resulting in a greasy fry.  When the potatoes were done cooking I removed them with a metal slotted spoon and placed them on paper towels to drain, then sprinkled them with kosher salt.

Sour Cream Sauce

While the potatoes were frying up, I took 1/2 of the butter and melted it in a saucepan and added the flour and dry mustard, cooking for about two minutes.  If you like a nutty flavor to your sauces, continue cooking the roux (flour and butter mixture) for another 30 seconds to a minute and it will start to brown a bit.  I then added the chicken stock slowly, whisking constantly.  I brought that (basically chicken gravy) to a boil and cooked until it thickened a bit, and mixed in the sour cream.  Once the sour cream was fully incorporated, I took it off the heat and set it aside.

So Much To Do at Once...Potatoes, Onions and Sauce Cooking.

With the sauce under control, I sliced the onions and sauteed them in the remaining butter  until soft and a bit caramelized (about 6 minutes).  With the onions underway, I sliced the beef and placed it in the pan, cooking until the bits were cooked to about medium.  When you make stroganoff with hamburger, you have to cook it completely, but with the beef, I figured that it would continue cooking in the sauce for a bit and I wanted to make sure that it was cooked enough to eliminate the blood that may still be in the meat, but keep it from overcooking in the sauce and make it tough and stringy.

When the meat was cooked, I emptied the saucepan into the skillet and brought it back up just below a boil.  I plated the dish by placing the beef and sauce mixture on the plate, setting a handful of potatoes on top of it and then sprinkling with parsley.


Beef Stroganoff - Schuler Version

I had the same problem with this stroganoff that I had with the version that my mother made, I couldn't get enough!  The meat turned out just right, tender and moist.  The sauce had that fantastic sour cream tang, but deeper flavors thanks to the onion and dry mustard.  The potatoes were OK, but in a next round, I would slice the matchsticks smaller.  Mine ended up being more like fries than matchsticks (see pic above).  I still prefer noodles though.  I did miss the mushrooms, which would be easy enough to add into the recipe.
Beef Stroganoff - Saveur Version
Credit: Todd Coleman

My dining companions (Kim and my sister Brooke) were big fans of the meal.  Enough that we had no leftovers.  They enjoyed the flavor and Kim was especially happy to not have to pick out mushrooms from her dinner.

Another recipe in the books, and again, a recipe that I will make in some form again in future.  Next on the list - my first ever attempt at Indian Cuisine - Saag Paneer.  Should be interesting!

8 down, 93 to go.

Saturday, October 27, 2012

Ful Medames

Ful Medames Ingredients

And now for the easiest recipe of the 101 Recipe Challenge thus far, Ful Medames.  The introduction to the recipe lists the dish as the national dish of Egypt and a delicacy usually eaten for breakfast.  I'm a big fan of many types of beans, so I was looking forward to this recipe (with the exception of the hard boiled eggs).

The recipe consists of canned fava beans, lemon juice, garlic, olive oil, cumin, cayenne pepper, salt, black pepper; with chopped parsley and hard boiled eggs for garnish.  I drained and rinsed the beans and placed them in a 2 quart saucepan and covered them with water by 1" and boiled over medium high heat for 8 minutes.

Boiling Fava Beans

I drained the beans again and combined with the liquids and spices in a bowl.

Ful Medames - Pre-Mash

Using my wooden spoon, I mixed the ingredients, taking care to begin mashing the beans lightly while stirring them.  To plate, I placed the bean mixture on a plate, drizzled with olive oil, sprinkled the dish with minced parsley and surrounded with egg wedges.

Ful Medames - Saveur Version
Credit: Todd Coleman
Ful Medames - Schuler Version

While I didn't have the Ful for breakfast, after one taste I can understand why it is beloved by many in the Middle East.  I am not a big fan of hard boiled eggs, so I started by tasting the beans straight.  There haven't been many things I've eaten that have had a flavor that evolves through the mouthful as this does.  Before the spoonful even fully hits your mouth, the smell of the beans and cumin start the process, then you first taste the savory beans.  Next you catch a bit of the olive oil, but more importantly the acidity of the lemon juice.  Finally, the black pepper and cayenne give you a good kick, not enough to distract, but you still feel it.  The mouth feel of the Ful was fantastic.  The velvety mashed beans studded with some whole beans, drizzled with olive oil...it was fantastic.  I did try a few bites with the egg and didn't mind it...which is probably the best thing I could ever say about a hard boiled egg.

My wife Kim enjoys cumin as much as I enjoy hard boiled eggs, and to her credit she tried the Ful Medames.  She didn't mind the texture but the cumin was just too overpowering.  My sister had joined us for dinner (Ful for an appetizer, Beef Stroganoff - which will be my next post -for the entree) and enjoyed the beans.  Between the two of us, I believe we cleaned the plate.

All in all, will be making this again for sure.  It's quick, easy and tasty - some of my favorite qualities in a meal.

7 down, 94 to go.

Wednesday, October 24, 2012

Chicken with Forty Cloves of Garlic

Chicken with Forty Cloves of Garlic Ingredients

Next up, Recipe # 32 in Saveur Magazine's 101 Classic Recipes, Chicken with 40 Cloves of Garlic.  I've seen variations of this recipe in several cookbooks (like these versions from the Gourmet Cookbook and Allrecipes.com) but have stayed away because I thought that the garlic would have been so overpowering that it would render the meal inedible.  In a small way, this recipe exemplifies one of the main reasons that I undertook this challenge, to expand my horizons and put me outside of my culinary comfort zone.

The ingredients for the recipe are olive oil; a whole chicken cut up into 8 pieces; salt and pepper to taste, dry vermouth, tarragon and of course - 40 cloves of garlic.  I first used my semi-fabulous butchering skills to split up the chicken into its various parts.

One of my college roommates that was a butcher's assistant taught me how to split a chicken and it is a skill that has served me well (you can find online instructions here).  In most cases, I prefer to buy whole chickens and cut them up for recipes.  If nothing else - it saves me a little on my grocery bill (usually whole chickens cost a bit less than prepared chickens; a whole lot less than boneless, skinless chicken breasts) and I usually toss the remaining carcass into the freezer to use in making chicken stock when I have the opportunity.  Nothing is better than chicken soup in the middle of December made from scratch.  After splitting the chicken, I applied an ample dose of kosher salt and ground black pepper on both sides.

Chicken Split Into Eight Pieces

I warmed up the olive oil in my dutch oven over medium high heat and once it was up to temperature I  added the chicken and browned for approximately 15 minutes, turning once.  As well I began pre-heating the oven at 350 degrees.

Chicken Browning in a Dutch Oven
 
While the chicken cooked, I took the opportunity to peel the forty cloves of garlic.  The recipe notes that you can use as many one hundred cloves when cooking, but I barely got forty peeled in the time it took the chicken to brown.  In retrospect, pre-peeled garlic would have been key and much more time efficient.

Cloves of Garlic

And of course, much easier to clean up after cooking!

Irv - Clean up in aisle 8.

After the chicken had finished, I placed it in a casserole dish and set aside and tossed the garlic into the dutch oven to cook for 6 minutes, stirring often, until they too began to brown.


Once the garlic was browned and I had successfully tested the vermouth (martini anyone?), I added a half cup to the garlic and reduced it, scraping the bottom of the pan well as it reduced.  After two minutes I added the chicken stock and brought it to a boil.

Garlic, Vermouth and Chicken Stock 

 After the fragrant brew came to a boil, I transferred a quarter of the cloves to the casserole dish and used my potato masher to mash the remaining cloves into a pulpy mix, which I then poured over the chicken and placed in the oven for 20 minutes.

Chicken - Heading into the Oven

After the chicken was fully cooked, I followed a "bonus" step in the recipe and cooked the garlic a bit longer, then took a whisk to it to make a pan sauce.  The whisk didn't break the garlic down as much as I would have liked (maybe if I had cooked the garlic longer, it would have had the desired effect) so I used an immersion blender on the sauce until it was an outstanding emulsion of garlic and chicken juices. Below is a picture of one of my standard sauce tests - a roll or slice of bread dipped in the sauce to test it for seasoning and flavor.  I could simply use a spoon, but what fun is that.


As I noted, going into the recipe, I had a concern that the garlic would be too much and overpower the dish.  I did not need to worry.  I'm not sure if it was cooking the garlic in vermouth that mellowed out the flavor a bit or if any dish can only attain a certain level of "garlicky", no matter how much garlic you put into it.  The chicken was moist and had a great flavor, especially when additional sauce was spooned over it and sprinkled with tarragon.

Chicken  with Forty Cloves of Garlic - Saveur Version
Credit: Penny De Los Santos
Chicken  with Forty Cloves of Garlic - Schuler Version


My dining companion loved the chicken (breast) and thought that the flavor was intense, but enjoyable.  I had a wing and thigh and agreed that though it was intense (I think that we cleared the vampires from our neighborhood for good), the chicken had a great texture and earthy, almost root vegetable (parsnip, carrot) undertones in its flavor.  When I make this recipe again, in addition to using peeled garlic, I will also brown both the chicken and the garlic for quite a bit longer.  The wing I had, while cooked, was missing the slight crunch that it should have had and I believe that if I cooked the garlic longer in the first stage, it would have brought a deeper flavor to the dish and broken down more readily in the sauce when it was whisked.

Another one in the win column and and easy recipe that could be made on any given Sunday afternoon when I'm in the mood for some garlicky goodness.

Next on the list - Ful Medames (Stewed Fava Beans).

6 down, 95 to go. 

Wednesday, October 17, 2012

Senate Bean Soup

Next up in the 101 Recipe Challenge - Senate Bean Soup.  According to the entry in the October issue of Saveur Magazine, this recipe for Senate Bean Soup is similar to the version carried on the menus of many restaurants in the area of Washington D.C. near the U.S. Senate in the early 20th Century.


Ingredients for Senate Bean Soup

The soup consists of 7 ingredients (Navy Beans, onion, unsalted butter, a smoked ham hock, water, salt and black pepper).  Preparing the recipe takes a bit of foresight as the beans must soak overnight in water. 

Soaking Navy Beans

Once thoroughly soaked, I gave the beans a good draining and tossed them into my dutch oven with 8 cups of water and a smoked ham hock.  Most  home cooks north of the Mason Dixon line don't have a ton of opportunity to use the lesser known bits of the pig, the ham hock being one of them.  The "hock" of a ham is part of the hind leg of a pig, usually the section between the joint and the foot.  It usually is full of fun stuff like ligaments, bone and a really thick skin.  Almost always smoked, cured or smoked and cured, it is used in soups, stews and other braised foods to impart a smoky, salty flavor to the dish.  I have used ham hocks in other recipes (Collard Greens, Kale stew, Baked Beans) and they almost always must be cooked for a long period of time to break down the tough tissues inside of hock.

Navy Beans and Ham Hocks - pre-cooking

The recipe called for one ham hock, but the ones I had seemed small so I tossed in two.  I brought them to a boil and simmered for an hour.  Towards the tail end of the hour, I finely chopped an onion and sauteed in butter until soft, then added it into the soup.

Simmering Soup and Sauteeing Onions

The recipe called to cook until the beans were soft (about an hour) and I simmered the beans to the point where they would squish a bit when I squeezed them.  I then pulled the hocks out (I don't think I ever thought I would use the word hock so much at one time), and let them cool a bit.  I pulled the skin off and set to pull as much meat as possible off the bone.  I'm glad that I put two into the stew because the actual meat was pretty scarce.  As you can see from the image below, the majority of each piece was bone and skin.  During my research several sites said that you could substitute 4 ounces of salt pork or thick cut bacon for a ham hock in a recipe.  I think I was able to pull about 4 ounce combined off of the two that I had cooked.


Ham Hock - deconstructed

I then took my potato masher and mashed the beans a bit until it had a "thick, creamy texture" as described in the original recipe.  I folded in the ham, grabbed a piping hot bowl, ground on some salt and pepper and was ready for lunch.

Senate Bean Soup - Schuler Version


Senate Bean Soup - Saveur Version

The first taste seemed a bit bland, so I doubled up on the salt and pepper.  The consistency was good, but the beans didn't seem to be cooked completely.  It could be that I personally like beans that are really soft (think Bush's baked) and these were a bit more like al dente pasta.  There was a smokey flavor to the soup, but it could have been heavier.  I thought about hitting the dutch oven with my stick blender for a minute and trying to puree the beans a bit more, but wanted to stay as true to the recipe as possible.  The recipe description noted that it started in the early 20th century, and I could have definitely seen this as being eaten during that time.

I think that there would be a few things that I would have done different if I were to cook this again.  First I would soak the beans twice as long and probably cook them twice as long as well.  If I used a ham hock again, I would score the skin, letting out more of the flavor, and hopefully breaking the cartilage and connective tissue down a bit more.  But I think I would rather cook up a half a pound of thick sliced bacon or browned salt pork, then add 3/4 of it to the beans as they cooked, and the remainder after the beans were mashed.

Notes from my #1 taste tester - "The beans are a bit too tough, but with the flavor of the ham, it reminds me of  the baked potato soup from Bennigan's" (where I worked for a few years).

While Elvis Presley's Pound Cake will become at least an annual part of my repertoire, I'm not sure that Senate Bean Soup will be showing up again anytime in the near future.

5 down, 96 to go!